$ whoami

Fırat Ada

Global BI & DWH Director · 18+ years in Data Science, BI & AI — more →

claude code tutorials

Claude Code Basics

4 min read

Claude Code is Anthropic's agentic AI tool. It is not a classic chatbot AI that only answers in a browser window. You install it on your computer, and it takes real control of your machine: it reads your files, edits your code, and runs commands on your system — with your permission.

In this tutorial we'll install it, walk through the core concepts, and make a first real change to a project.

Installation

You need Node.js 18+ installed. First, open a terminal: press the Windows key, type cmd and press Enter (on Mac, open Terminal). Then install Claude Code (docs) with this command:

npm install -g @anthropic-ai/claude-code

Start Your First Session

⚡ read this first — where do I type commands?

Everything on this site happens in the Claude Code terminal. First, open the terminal inside your project folder. On Windows: open the folder where you want to build your project, click its address bar in File Explorer, type cmd and press Enter. A terminal opens directly in that folder.

Now type claude and press Enter. Claude Code starts inside that folder — it sees your project files and knows the folder.

Claude Code names each session by itself — usually from your first message. To change that name later:

# inside Claude Code
/rename my-project-name

How do you return to a session you opened before?

Go to your project folder, click its address bar in File Explorer, type cmd and press Enter to open the terminal again. Then:

# in your normal terminal (cmd)
claude --resume

This lists all your sessions in that folder — pick one and continue where you left off.

Tired of the approval questions? Auto-approve them

By default, Claude Code asks permission before editing files or running commands. To turn that off:

# in your normal terminal (PowerShell) — start Claude Code like this
claude --resume --dangerously-skip-permissions
⚠ be careful

With permissions off, Claude can edit files and run commands without asking you first. Use this only in projects you trust and back up (git helps).

Working with a corporate data warehouse? Give Claude Code its own database user: drop/create rights only in its own schema, and read-only access to mission-critical schemas. Never let it connect with a full-rights account.

Getting to Know Claude's Folders

1 min read

Where your data lives

Claude Code keeps everything on your own computer:

  • Conversations — every chat is saved in C:\Users\<you>\.claude\projects
  • Skills — installed skills live in C:\Users\<you>\.claude\skills. When you ask Claude to download a skill, tell it to save it there.

Useful Commands to Know

1 min read

Deep thinking: ultrathink

# inside Claude Code — just include the word in your message
ultrathink — design the database schema for this app

Type the word ultrathink anywhere in your message (it turns colorful in the terminal). Claude then spends more time reasoning before it answers. Use it for hard, multi-step problems: architecture decisions, tricky bugs, planning. Skip it for simple questions.

CLAUDE.md — The Master Rulebook

4 min read

If you take one thing from this site, take this: CLAUDE.md is the master rule set of your project. It defines how Claude Code behaves in your repo — every session, every task, without you asking. In short: Claude learns how you take your coffee.

⚡ the one rule that matters

Claude Code automatically reads only CLAUDE.md. No other markdown file in your repo is loaded on its own.

Your other .MD docs — memory.md, design.md, admin.md, specs, handoffs — are read only if CLAUDE.md references them. A brilliant doc that CLAUDE.md never mentions is invisible to Claude Code — unless you mention it specifically in your prompt.

The global CLAUDE.md does not come ready-made

Installing Claude Code does not create a global CLAUDE.md. You create it once, yourself — the easiest way is plain language:

# inside Claude Code — just ask
create a global CLAUDE.md for me

The word "global" matters: if you leave it out, Claude creates the file for the project you are working in, not the global one. Always say global when you mean the file that applies everywhere. Claude creates it at C:\Users\<you>\.claude\CLAUDE.md. From then on it is loaded automatically in every project, every session.

If you do want a CLAUDE.md for the current project, there is a dedicated command for that — prefer it:

# inside Claude Code
/init

/init scans your project and generates a CLAUDE.md for that project only.

How the loading actually works

At the start of every session, Claude Code loads the CLAUDE.md files it finds (project root, plus your global ~/.claude/CLAUDE.md). Every time you ask a question, this is what actually gets sent to the LLM:

your question + your global CLAUDE.md + your project CLAUDE.md

That is why a very long CLAUDE.md makes you spend more tokens.

Everything else is read on demand. Claude Code will open docs/architecture.md only when something points it there: a line in CLAUDE.md, or you asking for it in the conversation.

What Should an Ideal Global CLAUDE.md Contain?

6 min read

This changes from person to person — but here is what's in my global CLAUDE.md, so you can use it as a starting point.

Rules that belong in CLAUDE.md by default — Karpathy Rules

Some rules are so important that they should not live in an optional skill or plugin that may or may not run. Put them directly into CLAUDE.md so they apply on every coding, review and refactor task. The best example is Andrej Karpathy's coding guidelines:

## Coding Discipline
Apply these on every coding, review, or refactor task (Karpathy guidelines):
- **Think before coding** — state assumptions explicitly; if multiple
  interpretations exist, present them instead of silently picking; if a
  simpler approach exists, say so.
- **Simplicity first** — minimum code that solves the problem; no
  speculative features, abstractions, configurability, or error handling
  for impossible cases.
- **Surgical changes** — touch only what the request needs; don't refactor
  or reformat unrelated code; match existing style; only remove orphans
  your own change created.
- **Goal-driven** — turn each task into a verifiable success criterion
  (a test or concrete check) and loop until it passes.

Pay special attention to the third rule. "Surgical changes" targets the most common LLM problem: breaking something else while doing what you asked for. Without this rule, models often try to "improve" nearby code — reformatting lines, renaming things, changing working logic they were never asked to touch. That is exactly where new bugs come from. This one line turns that behavior off: every changed line must come directly from your request.

More rules from my global CLAUDE.md

These are all general-purpose — copy the ones you like:

Reference doc rule

## Reference Doc Rule
Whenever a new `.md` documentation file is created, add a one-line
reference to it — in the same commit — in the CLAUDE.md of its level:
- Global file under `~/.claude/` → reference in `~/.claude/CLAUDE.md`,
  under the Reference Docs section.
- Project file (e.g. `memory.md`, `design.md`, handoffs, specs) →
  reference in that project's `CLAUDE.md`.
Format: - [`filename.md`](./filename.md) — one-line description.
A doc that CLAUDE.md never mentions will never be read.

**User-agnostic paths in .md files:** when a markdown file records an
absolute path under a user profile, write it as `C:\Users\<user>\...`
— never a specific username; every reader has their own. Code and
configs keep real paths; this rule is about documentation. When using
such a path, resolve `<user>` from the current environment.

**Docs-first pointer wording:** when a CLAUDE.md delegates a project's
rules to a reference doc, never scope the pointer to changes only.
Word it as docs first, code second, for ALL work: "read it before any
change AND before answering any question about how something works —
the code is only the implementation of those rules."

Wikilink compatibility

## Wikilink Compatibility
If a `.md` file I'm already editing contains a `[[wikilink]]` and I can
resolve the target file, add a markdown link next to it pointing to the
same target: `[[design]] ([design.md](./design.md))`. If the target
can't be resolved, leave the wikilink untouched. Never sweep unrelated
files for this.

The `+name` shorthand — save rules as you chat

## Quick MD-Update Shorthand (`+<name>`)
When a message contains a `+<name>` token (e.g. `+design`, `+admin`),
take the rule stated in that sentence and add it to the markdown file
`<name>.md`. Look in the current project first; if the file is not
there, use the global `~/.claude/<name>.md` (create it if missing).
A trailing `g` (`+design g`) means: always write to the global file.
Don't duplicate — if an equivalent rule exists, refine it instead.

How it works in practice — you are chatting with Claude and notice something you want as a permanent rule. Just add the token to your sentence:

# inside Claude Code — a normal chat message
Numeric table columns should always be right-aligned. +design

That's it. Claude writes the rule into design.md and keeps working. Next session, the rule is already active — you never open the file yourself. Instead of typing a long sentence like "please add this rule to my design.md file", you just say +md — and it's done.

Terminology consistency

## Terminology Consistency
Within a project, use ONE consistent term for each concept everywhere
it appears — labels, tooltips, headings, docs. Never mix synonyms for
the same thing; never reuse one term for two different concepts.

Project memory file

## Project Memory File
Every project should have a `memory.md` at its root — a condensed,
human-readable reference: ports & commands, data model, architecture,
design decisions, and known gotchas. Reference it from the project's
CLAUDE.md and keep it current as the project evolves.

Restart servers yourself

## Server Restarts
When the local backend/dev server needs a restart, do it yourself —
don't ask me to do it.

Cache invalidation on mutations

## Cache Invalidation on Lookup Mutations
Any project that caches lookup/reference data must invalidate that
cache immediately after every mutation (POST, PUT, DELETE). Changes
must show up instantly — never wait for a TTL or a server restart.

The `question:` prefix

## `question:` Prefix
When a message starts with `question:`, take NO action — no edits,
no commands, no fixes. Only answer the question, nothing more.

The `got it` suffix

## `got it` Suffix
When a message ends with `got it?` or `got it`, explain back to me
what you understood — your interpretation, assumptions, and planned
approach — and take NO action until I explicitly confirm.

Terminal commands — one per line

## Terminal Commands — one per line
When giving commands to run in a terminal, provide them as single-line
commands, one per code block, so each can be copied and pasted as one
line. No multi-line blocks, no line continuations, no heredocs.

Auto-Commit Policy

## Auto-Commit Policy
Commit automatically after each completed and verified unit of work —
don't ask first each time.
- Commit only when the change works (build/tests/manual check pass).
- One feature/fix per commit, with a clear message.
- Commit to the current branch, local only. Never `push` without
  my explicit approval.
- Never commit secrets (.env, files with passwords/tokens/keys).

Takeaways

  • CLAUDE.md is the only file Claude Code reads automatically — treat it as the master rulebook.
  • Child .md docs exist only if CLAUDE.md references them. New doc → new reference line, same commit.
  • Always-on rules (like the Karpathy coding discipline) belong inside CLAUDE.md, not in a skill that needs to trigger.
  • Keep it short and current — you pay for its content in every session.
Plugins & Skills — How to Extend Claude Code

2 min read

Plugins and skills turn Claude Code into a specialized expert on any topic — a designer, a tester, a database engineer. They are your most important weapons. Here is what each word means:

  • Skill — a small folder with instructions that teaches Claude one specific ability (e.g. "design beautiful UIs" or "test web apps"). It lives in C:\Users\<you>\.claude\skills.
  • Plugin — a packaged extension you install with one command. A plugin can contain skills, tools and commands together.
  • Marketplace — the source you install plugins from, like an app store. You add a marketplace once, then install any plugin it offers.

We cover installation and the best picks in detail in the skills section below — each card there shows the exact install and invoke commands.

claude connectors

Connectors — Connect Claude to Your Other Tools

2 min read

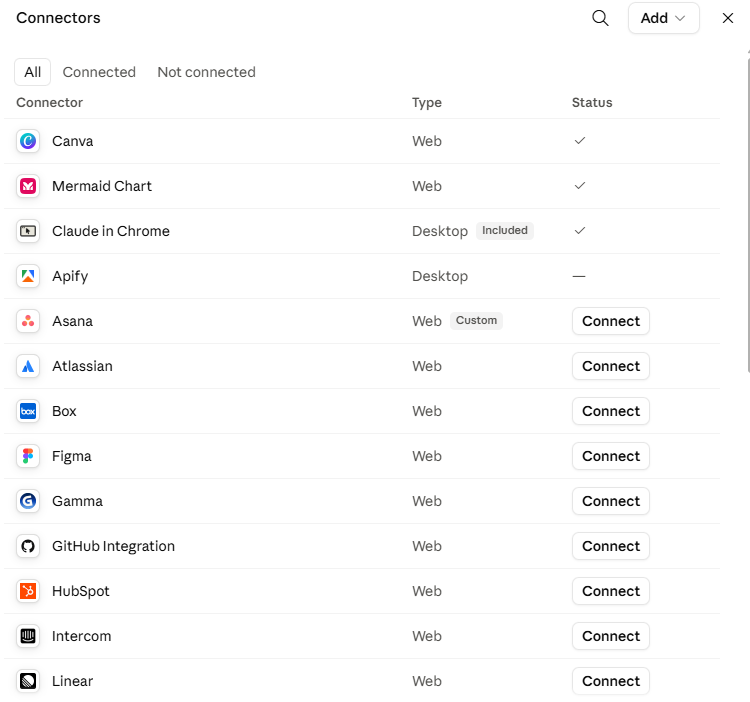
Connectors link Claude to all the other tools you already use — Canva, Asana, Atlassian (Jira/Confluence), Box, Figma, GitHub, HubSpot and many more. Once connected, Claude can read from and work with those tools directly.

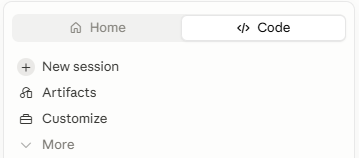
Step 1 — In the Claude desktop app, switch to the Code tab and click Customize:

Claude desktop app: Code tab with Customize menu item

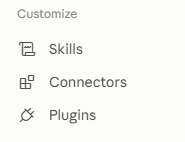
Step 2 — In the Customize menu, choose Connectors (Skills and Plugins are also managed here):

Customize menu: Skills, Connectors, Plugins

Step 3 — The connector list opens. Click Connect next to any tool and follow the login flow:

Connectors list with Canva, Asana, Atlassian, Figma, GitHub and more

After connecting, just mention the tool in your prompt — e.g. "create a Jira ticket for this bug" or "pull my latest Figma design".

CLI Tools — Supabase, GitHub, Netlify, Vercel

2 min read

Some services connect to Claude Code through their own CLI tools (command-line programs). Install the CLI once, log in once — from then on Claude uses it for you. You just say what you want in plain language, and Claude runs the right commands: deploy, configure, manage.

Supabase CLI

Supabase is the online backend of your projects — your online database / DWH, auth and storage in one service.

# in your normal terminal (PowerShell)
npm install -g supabase
supabase login

GitHub CLI

GitHub is the secure online storage of your code — every project lives there as a repository.

# in your normal terminal (PowerShell)
winget install GitHub.cli
gh auth login

Netlify CLI

Netlify is a hosting provider — this site itself is deployed on it.

# in your normal terminal (PowerShell)
npm install -g netlify-cli
netlify login

Vercel CLI

Vercel is another popular hosting provider, especially strong for Next.js projects.

# in your normal terminal (PowerShell)
npm install -g vercel
vercel login

Then just talk

# inside Claude Code — examples
Deploy this site to Netlify.
Create a GitHub repo for this project and push the code.
Create a new table in my Supabase database for user feedback.

Claude connects through the CLI automatically and handles the whole flow — one natural-language command is enough to deploy and manage all of them.

claude code plugins

Claude Code Official Plugins

claude.com/plugins
2 min read

Anthropic's official plugin directory — browse plugins that bundle MCPs, skills and tools into a single download. Look for the "Anthropic Verified" badge, and only install plugins from developers you trust.

install
# inside Claude Code
/plugin install frontend-design@claude-plugins-official
invoke
# inside Claude Code — opens the plugin menu (browse, install, manage)
/plugin

Note: run /reload-plugins to use a freshly installed plugin in the same session.

Alongside this plugin marketplace, we also recommend installing the Anthropic Official Skills. Many abilities overlap between the two — the same skill often exists both as an official plugin and inside the official skill set.

2 min read

One of the most important features. After you build something, Claude can test it like a real user: it opens your project in a browser automatically, clicks through the pages, fills in data, reads console errors and takes screenshots. You can also ask it to write full test scenarios for a new feature.

install
# in your normal terminal (PowerShell)
claude plugin install playwright@claude-plugins-official
invoke
# inside Claude Code
/webapp-testing
# or just ask in plain language, e.g.
Test the login page in the browser.
tip — prompt like a feedback loop

The best prompts tell Claude how to check its own work. Compare:

# weak
Build the shipping calculator.

# strong — a feedback loop
Build the shipping calculator.
After every change, run npm test.
Fix the errors before saying it's done.

You can also make this permanent by adding it to your project's CLAUDE.md:

# After every change
Run `npm run test` and fix failures
Run `npm run lint` and fix issues

Watch the demo video

1 min read

Official MongoDB plugin — query and manage your MongoDB databases in plain language.

install
# in your normal terminal (PowerShell)
claude plugin install mongodb@claude-plugins-official

claude code skills

⚡ the -g flag

Adding -g to the end of a skill download command installs the skill globally — usable in all your projects. Without -g, it is downloaded only for the project folder you are in.

Anthropic Official Skills

anthropics/skills
2 min read

Anthropic's official skill collection — document skills (PDF, Word, Excel, PowerPoint), frontend design, skill creator, webapp testing and more. One download gives Claude all of them.

install
# inside Claude Code — just ask in plain language
connect to https://github.com/anthropics/skills and download
all the skills to my global claude folder
invoke
They trigger automatically by task — e.g. ask for an Excel file
and the xlsx skill runs. Type / to see the full list.
what's inside
  • xlsx — Excel
  • pptx — PowerPoint
  • pdf — PDF files
  • docx — Word
  • frontend-design
  • skill-creator
  • webapp-testing
  • canvas-design
  • theme-factory
  • brand-guidelines
  • mcp-builder
  • web-artifacts-builder
  • claude-api
  • doc-coauthoring
  • internal-comms
  • slack-gif-creator
  • algorithmic-art

The stars of the set are the document skillsxlsx (Excel), pptx (PowerPoint) and pdf. The pdf skill alone replaces a PDF editor: edit, merge, split, fill forms, add watermarks — you just describe what you want and Claude does it on the file.

Frontend Design

anthropics/skills
1 min read

Anthropic's official skill for building distinctive, polished web UI that avoids the generic "AI look".

install
# inside Claude Code
/plugin marketplace add anthropics/skills
/plugin install frontend-design@claude-plugins-official
invoke
# inside Claude Code
/frontend-design
# or just mention it in plain language, e.g.
Use the frontend-design skill while building this page.

Andrej Karpathy Skill

forrestchang/andrej-karpathy-skills
1 min read

Instead of using this as a separate skill, I find it more effective to add its rules directly to CLAUDE.md — see why above.

Skill Creator

anthropics/skills
1 min read

Lets you build your own skills. Think of it like defining a function in SQL: instead of explaining a long procedure to Claude every time, you wrap it once as a skill — and from then on it runs with one short command.

install
# inside Claude Code
/plugin install skill-creator@claude-plugins-official
/reload-plugins
invoke
# inside Claude Code — example prompt
Use skill creator to turn my fancy-linkedin.md file into a design
skill I can call with /design-fancy-linkedin
1 min read

Design intelligence for web and mobile: 50+ styles, color palettes, font pairings and UX guidelines, applied to your UI work.

install
# in your normal terminal (PowerShell)
npx skills add https://github.com/nextlevelbuilder/ui-ux-pro-max-skill.git -g

# or with its own CLI:
npm install -g ui-ux-pro-max-cli
uipro init --ai claude
invoke
Activates automatically on UI/UX requests — just describe what
you want, e.g. "Build a landing page for my SaaS product."

Superpowers

obra/superpowers
1 min read

A full workflow toolkit: brainstorming before coding, systematic debugging, test-driven development, plan writing and more.

install
# in your normal terminal (PowerShell)
claude plugin install superpowers@claude-plugins-official
invoke
Triggers automatically (e.g. brainstorming before new features,
systematic-debugging on bugs) — no manual command needed.

Emil Design Eng (Animated Buttons)

emilkowalski/skill
1 min read

This skill adds small, minimal motions to your design — every time the mouse moves over an element, it reacts. It gives your UI energy and a real sense of touch. When all your frontend work is done, ask it to revise your design as the final polish. Samples at animations.dev.

install
# in your normal terminal (PowerShell)
npx skills add https://github.com/emilkowalski/skill
invoke
# inside Claude Code — example prompt
Use the /emil-design-eng skill to improve one aspect of the
design, then show me exactly what you changed.
1 min read

Creates video presentations of your work — show what you built instead of describing it.

install
# inside Claude Code
/plugin marketplace add latent-spaces/brag
/plugin install brag@brag

See a demo on X

1 min read

Runs your question through a council of 5 AI advisors that debate, peer-review each other and give a final verdict. A skill version of Karpathy's llm-council.

install
# in your normal terminal (PowerShell)
npx skills add https://github.com/aiwithremy/claude-skills-llm-council/blob/main/SKILL.md -g
invoke
# inside Claude Code — say things like:
council this / pressure-test this / debate this
1 min read

Writes a handoff document when you stop working, so the next session (or the next person) knows exactly where you left off.

install
# manual install:
1. Download SKILL.md from the repo (skills/productivity/handoff/)
2. Create a folder: C:\Users\<you>\.claude\skills\handoff
3. Put SKILL.md inside it
invoke
# inside Claude Code
/handoff

Humanizer

blader/humanizer
1 min read

Removes the signs of AI-generated writing from text, based on Wikipedia's "Signs of AI writing" guide.

install
# in your normal terminal (PowerShell)
git clone https://github.com/blader/humanizer.git C:\Users\<you>\.claude\skills\humanizer
invoke
# inside Claude Code — just ask
Humanize this text / make this sound less AI-written

Impeccable

pbakaus/impeccable
1 min read

Very effective frontend skill: design, critique, polish and improve any interface. It interviews you first, then designs.

install
# in your normal terminal (PowerShell)
npx skills add https://github.com/pbakaus/impeccable.git -g
invoke
# inside Claude Code
/impeccable init   → asks you questions, then builds the design

Design Taste Frontend

Leonxlnx/taste-skill
1 min read

Anti-slop frontend skill for landing pages, portfolios and redesigns — ships interfaces that don't look templated.

install
# in your normal terminal (PowerShell)
npx skills add https://github.com/Leonxlnx/taste-skill --skill "design-taste-frontend" -g
invoke
Activates automatically on frontend design requests.

Hallmark

nutlope/hallmark
1 min read

Paste a design you admire — a screenshot or a URL. Hallmark reads its structure, not its pixels, and returns a DNA card you can build against. Or say "lock the DNA" to write a portable design.md you can hand to another AI tool. Never copies pixels. Tighter refusal layer for the portable spec than for the diagnosis.

install
# in your normal terminal (PowerShell)
npx skills add nutlope/hallmark -g
invoke
Activates automatically on design work — or call it by name:
"use hallmark to redesign this page"

Looking for more? Browse the community skill directory at skillsmp.com.

claude + obsidian

Claude + Obsidian — Your Tool for Central Context Management

3 min read

CLAUDE.md works best as an index: it links to every other doc in your setup. Obsidian can open the same folder as a vault. The result: your Claude Code rules become a visual knowledge graph, with CLAUDE.md at the center.

One thing makes this work: link format. Obsidian builds its graph from links. Claude Code follows links too. But they prefer different formats:

  • Markdown links[design.md](./design.md) — work everywhere: Claude Code, Obsidian, GitHub, any editor.
  • Wikilinks[[design]] — work only in Obsidian and similar note tools. Claude Code sees plain text.

So the base rule is simple: use markdown links in any file that Claude Code will read. But Obsidian creates wikilinks by default. To keep both worlds connected, add this rule to your global CLAUDE.md:

Rule 1 — Wikilink Compatibility

## Wikilink Compatibility
If a `.md` file I'm already editing contains a `[[wikilink]]` and I can
resolve the target file, add a markdown link next to it pointing to the
same target: `[[design]] ([design.md](./design.md))`. If the target can't
be resolved, leave the wikilink untouched. Never sweep unrelated files
for this.

What it does: every time Claude Code touches a file with a wikilink, it quietly adds the markdown twin next to it. Over time, your notes become readable by both tools — without one big risky cleanup.

"Open with Obsidian" — why it doesn't just work

Right-click a .md file → "Open with Obsidian" often does nothing. The reason: Obsidian is vault-based, not file-based. It can only open a file that lives inside a folder you have already added as a vault. A file outside every vault is invisible to it.

The one-time setup

  1. Open Obsidian → click the vault icon (bottom left)
  2. Choose "Open folder as vault"
  3. Select the folder that holds your markdown files (e.g. ~/.claude)

After this, every .md in that folder opens in Obsidian — and the graph view shows your CLAUDE.md hub with all its links.

How to organize vaults

  • One vault per project — clean graph per project. Adding a vault takes 30 seconds; Obsidian remembers all of them and you switch from the vault icon.
  • One parent-folder vault — works only if your projects sit under one folder (like C:\Projects\). Never make your whole user folder a vault: indexing gets huge and slow.

A practical setup: make ~/.claude a vault first — the global rules hub is where the graph has real value. Add project vaults only when you actually work on their notes. Tip: exclude noisy subfolders (like plugins/) via Settings → Files & Links → Excluded files.

1 min read

Turns any input (code, docs, papers) into a persistent knowledge graph you can query.

install
# in your normal terminal (PowerShell)
git clone https://github.com/safishamsi/graphify.git C:\Users\<you>\.claude\skills\graphify
invoke
# inside Claude Code
/graphify
2 min read

Persistent memory for Claude Code: it remembers past sessions, injects relevant context automatically, and can answer "how did we solve this last time?"

install
# in your normal terminal (PowerShell)
npx claude-mem install
npx claude-mem start     → starts the memory service
npx claude-mem stop      → stops it
invoke
Works automatically once started. Useful extras (inside Claude Code):
mem-search        → "did we already solve this?"
learn-codebase    → reads the whole codebase into memory (~5 min)
timeline-report   → a story of how the project evolved
notes
Runs at http://localhost:37777. It does NOT auto-start after a
reboot — run "npx claude-mem start" again (or set it up as a
Windows service).

skills for different professions

Claude for Legal

anthropics/claude-for-legal
2 min read

Anthropic's plugin suite for legal work: 9 practice areas (commercial, corporate, employment, privacy, IP, litigation...), plus law-student learning tools. Every output is a draft for attorney review — not legal advice.

install
# inside Claude Code
/plugin marketplace add https://github.com/anthropics/claude-for-legal
/plugin install commercial-legal@claude-for-legal

# restart Claude Code, then run the setup interview once:
/commercial-legal:cold-start-interview
invoke
# inside Claude Code — examples
/commercial-legal:review          → review a vendor agreement
/privacy-legal:pia-generation     → generate a Privacy Impact Assessment
/corporate-legal:tabular-review   → M&A diligence tabular review